


Rename a Project in Microsoft Project Server – Part 4
Version: 2.0
Applies to:
MS Project Server 2010
MS Project Server 2013
MS Project Online (Office 365)
This is the fourth part of the series to explain the details of different cases and how to best rename a project schedule in Microsoft Project Server EPM.
Table of Contents
1. Steps to rename a project using Project Web Access (PWA)
2. Steps to rename a project using MS Project Professional
3. Rename Project site
4. Scenarios: Renaming Project and different Statuses of Timesheets
5. Renamed Project Schedule and Business Intelligence Center Reports
Conclusion
Summary
Renaming a project in a MS Project Server EPM environment might require team members to adjust their timesheets based on few conditions.
4. Scenarios: Renaming Project and different Statuses of Timesheets
There are few scenarios based on different statuses of timesheet in MS Project Server.
1. In progress timesheet
2. Approved timesheet (Submitted)
3. Period Closed timesheet
1. In progress timesheet
2. Approved timesheet (Submitted)
3. Period Closed timesheet
Below is the table that summarizes the conditions.
Timesheet Status Table
|
Timesheet Status |
Description |
Can Recall |
Can Delete |
Project Name |
|
In Progress |
Active timesheet created before rename |
– |
Yes |
Old |
|
Approved (Final) |
Approved timesheet |
Yes |
– |
Old |
|
Period Closed (Final) |
Timesheet period closed |
No |
No |
Old |
|
Not Yet Created |
Not active yet |
– |
– |
New |
Note: In this scenario, we assume that users are listed as their own Timesheet Managers and so the submitted timesheets are auto-approved.
You can view status of a timesheet by going to Timesheet page and reviewing the bar above the timesheet grid area (below the ribbon).
| Project Web Access TimeSheet – In Progress Timesheet |
| Project Web Access TimeSheet – Approved Timesheet |
New Project name will show up in new timesheets if you go to future or past timesheet periods that were not created at the time the project was renamed (those with status of ‘Not Yet Created’). Timesheets where the project’s tasks were not shown, once you add tasks using Insert Row > Insert Task, will also show the new project name.
You can review summary of timesheets by going to Manage Timesheets page under Settings section on left navigation.
 |
| Project Web Access Manage Timesheets Link |
Review the status column and you will find timesheets with either one of the three statuses.
 |
| Project Web Access Manage Timesheets Page |
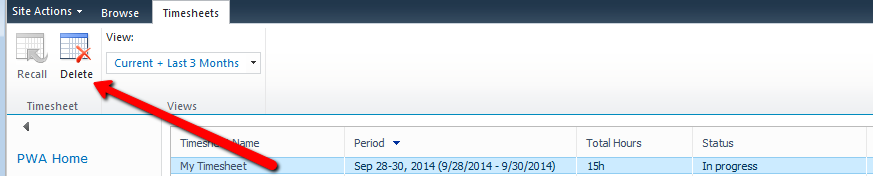
• Clicking on ‘My Timesheet’ under timesheet column for a period will take you to that Timesheet’s page and will show the details.
• Highlighting the row by clicking any area on the row except ‘My Timesheet’ will activate the Recall or Delete icons on the top left ribbon area. Review the Timesheet Status Table listed above to see when you can recall or delete a timesheet based on timesheet status.
 |
| Timesheet Recall icon |
 |
| Timesheet Delete icon |
Exception 1: In Progress Timesheet previously created
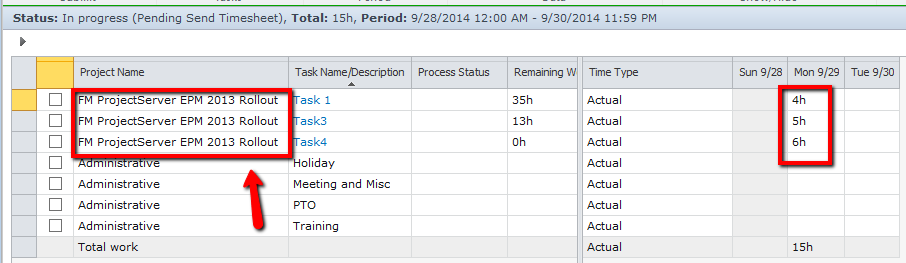
Timesheets that were created prior to the project rename will still show the old project name.
Note:
In screen shots of this part you can notice, I renamed the project again before this part.
 - In Progress Timesheet showing old project name") |
| Project Web Access (PWA) – In Progress Timesheet showing old project name |
Resolution
1. Go to Manage Timesheets page, select the row for the timesheet and hit Delete icon on top left of ribbon to delete the In-Progress timesheet showing old project name.
1. Go to Manage Timesheets page, select the row for the timesheet and hit Delete icon on top left of ribbon to delete the In-Progress timesheet showing old project name.
 |
| Project Web Access (PWA) – Delete In Progress Timesheet |
2. Now click over ‘Click to Create’ under Timesheet name to recreate the timesheet.
 - Create Timesheet") |
| Project Web Access (PWA) – Create Timesheet |
3. Once timesheet is created, you will be redirected to that timesheet. You can notice the new project name. Notice the previously saved hours are still intact.
 |
| Project Web Access (PWA) – Enter time in Timesheet under Project Tasks |
Exception 2: Approved Timesheet previously created & Submitted
The timesheets that were approved prior to project rename will need to be recalled and deleted. Then recreate and resubmit the timesheets. Other than recall, the rest of the steps are the same as listed in exception 1 case.
 - Save and Submit Timesheet Got Approved") |
|
|
 - Recall an Approved Timesheet") |
| Project Web Access (PWA) – Recall an Approved Timesheet |
That finishes third part of this series.
More on this and other scenarios is coming in next parts of this series. So far we have completed the three parts. Review the fourth part for timesheet related gotchas and remedies.
1. Steps to rename a project using Project Web Access (PWA)
2. Steps to rename a project using MS Project Professional
3. Rename Project site
4. Scenarios: Renaming Project and different Statuses of Timesheets
5. Renamed Project Schedule and Business Intelligence Center Reports
Conclusion
2. Steps to rename a project using MS Project Professional
3. Rename Project site
4. Scenarios: Renaming Project and different Statuses of Timesheets
5. Renamed Project Schedule and Business Intelligence Center Reports
Conclusion
Keywords:
- Renaming a project in Project Server
- Renaming a project in Microsoft Project Server
- Rename a project using MS Project
- Rename a project using MS Project Professional
- Rename a Project in Project Server
- best practice to rename a project in Project Server
- best practice to change a project name in Project Server
- How to change a project name in Project Server
- How To guide for renaming a project in Project Server
- Primer on renaming a project in Project Server
- Step by step guide to rename a project in project server
- Edit Project details to rename a project
- Rename a project schedule in Project Server
- Rename a project plan in Project Server
- How to rename projects in Project Server
- How to rename a mpp file in Project Server
- Renaming Projects
- Project rename process
- Project rename job aid
Visit www.softvative.com for professional services.